Making Wireless IoT Project Easy, Smart, Secure.
GET A FREE SAMPLEThe first time we go to use this Bluetooth module 4.2, if you have never dealt with them, it is likely to be taken by despair, as you need to know some small details to use them correctly, but do not worry, it will become clear. Soon, and soon we will be able to use them without even thinking about it for a few seconds.
Bluetooth modules are a very convenient way of communication if you do not want to transmit data through a cable connection; they really have a lot of potential, as it is possible to simply transmit numbers, decimal numbers, character strings and everything we need.
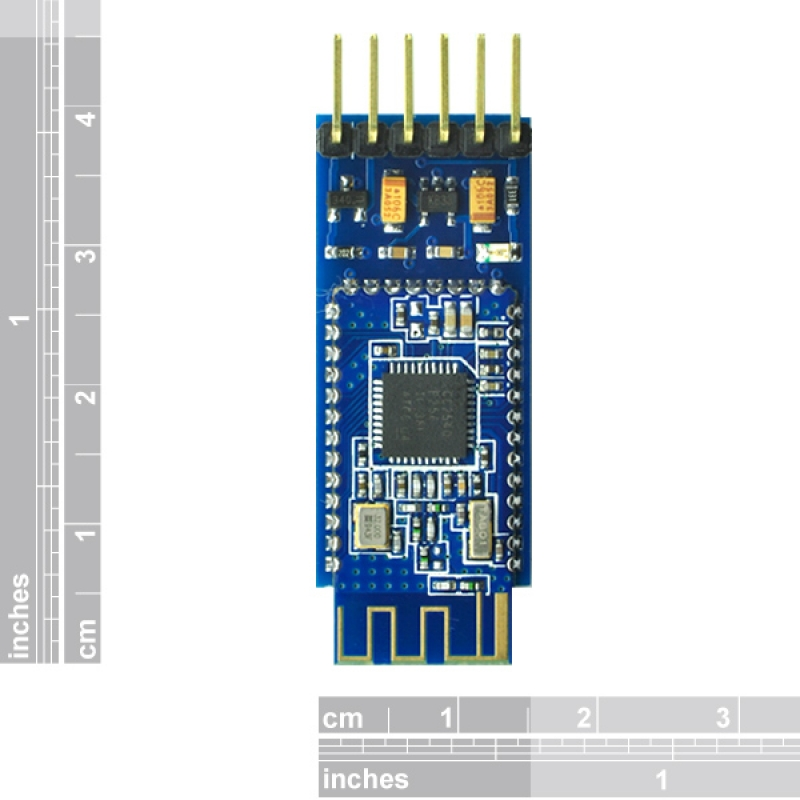
So let's start with how to connect our module to Arduino. This has four pins already soldered, plus two possibly to be soldered, but which we will not need. The four pins are RXD (<), TXD (>), GND (<), VCC (<). At first sight it all seems clear enough, but it's easy to make the first mistakes right now; first of all, we are going to power, our module through a voltage of 3.3 V, and not 5 V as we usually do.
Then obviously we connect the GND pin to GND of Arduino, and finally we connect the RXD pin to the TX pin of Arduino, and TXD to RX. Yes, the names of the two pins are reversed. By connecting them backwards we will not see any type of data transmission for Bluetooth module 4.2. And this is a very common problem.
The connections with our board are made, only a few small details are missing. First of all we have to understand how to enter AT mode. Otherwise it will be impossible to connect two bluetooth modules with correct communication.
This is not very simple in some types of modules. Moreover, some have a small side button on the right of the pins that allows us to perform the operation, while others do not.
In any case, now we are going to see how to solve this problem. We always remember that our component is called a module. It is installed on a base with copper tracks. Moreover, it allows us to use the micro controller without having to build a circuit every time. This is fundamental, since to allow our HC-05 to enter AT mode it is necessary to use a cable connected to a voltage of 3.3 V.
Bluetooth module 4.2 is powered, after which put our cable in contact with pin 34 of the micro controller. This is the last one on the top right next to the resistors. At this point, always keeping the cable firmly in contact with the pin, we must disconnect the power supply from VCC. And we should immediately reconnect it, then removing the contact with pin 34.
We could therefore observe that the red led. It indicates that our module is working slows down, remaining on for about two seconds and off as well. If the Led has this rhythm, we will have entered the AT mode. Below you will find an image of our micro controller (EGBT046S) installed in the HC-05 module which represents the pins whose functions you need to know.
Instead, if our module has the small side button, it will take the place of our hand-made contact. And the procedure will be to press the button while the Bluetooth module 4.2 is running. He will disconnect VCC, reconnect it and then release the button. We have held down until then.
When we enter AT mode, we must remember that the transmission baud rate between our components. And the serial interface automatically switches to 38400 baud. If we try to use AT commands at a different baud rate we will not have any results. It is therefore necessary to enter the serial monitor window and set it correctly before proceeding.
I have developed this simple example. It is to make you understand the potential of this module. In the meantime, we need to know that we must have two modules available to be able to do it. You need two Adriano’s, a ONE and a Mega, where the ONE controls the Bluetooth module 4.2 defined as master and the Mega the slave component.
Let's install the two devices in different places. Moreover, they communicate through a wireless connection. In this project we will in fact take data from a certain room to process them and output them in a visible way in another place, in particular I will use a photo resistor to process the light of one position and change the luminous intensity of a LED in the other and write a certain sentence.
The Bluetooth module 4.2 is very convenient for certain things, in fact, thinking about the use of a PIR to create a home security system, this component could play a fundamental role in transmitting information when the module detects a presence at the front door, to notify us immediately. .
We could therefore say that the Bluetooth module offers us transmission speed, convenience and versatility, and even if it is more expensive than making connections through data using the SDA and the SCL, its characteristics fully pay off for this detail.
After entering the AT mode (above is explained how to do it), we need to connect Bluetooth module 4.2 to make them communicate correctly.
Let's act on our master module, and, after having loaded the correct code shown above on the Arduino, we enter the serial monitor and write: AT, to verify that the module recognizes the AT commands, and will reply OK.
Currently there are already different types of Beacons. They are good for specific applications:
Prev:Why is blue tooth 4.2 LE modules great value for money?
Next:How to use bluetooth 5.0 ble module in business marketing?
Copyrights© Shenzhen Skylab Co.,LTD All Rights Reserved.


